How to use whatsapp on Personal Computer / Laptop using QR code

Nowadays WhatsApp is one of the most popular applications used for communication in the world. Some of the main reasons why WhatsApp is popular are:
  • Easy to use due to the simple interface.
  • Send messages, documents, multimedia files instantly without any charge to any person in any part of the globe.
  • No advertise on it.
  • Contacts will be imported directly to indicate who is using WhatsApp, so no need to check it manually
  • Directly broadcasting the same message to many contacts.
  • Group communication

Furthermore, another reason for the popularity is, WhatsApp can be used on a laptop or personal computer. Sometimes we want to send long messages to our friends. But typing such long message contents on mobile is irritating. Also on a small screen of mobile, we can make mistakes while typing. So to avoid these problems we can use the laptop for sending messages through WhatsApp account. Whatsapp have launched the web WhatsApp. Web WhatsApp uses QR code to take your mobile WhatsApp account on a laptop. QR (Quick Response Code) is machine readable two-dimensional matrix barcode. By scanning the barcode with mobile we can take WhatsApp account on the laptop. 
Now let us see what is required to take our mobile WhasApp account on the laptop.
  • Installed WhatsApp on mobile with authenticated account as new account will be created with this process. But already created an account on mobile can be taken on the laptop.
  • Needs Internet connection on mobile and also on the laptop.

Steps to take mobile WhatsApp account on the laptop


Step 1 : Open your WhatsApp application on mobile then click on three dots appearing at the top right corner of the application and select WhatsApp web.

Use WhatsApp Web
Using Web WhatsApp

Step 2 : Open Google Chrome, Mozilla Firefox or Internet Explorer's latest version on your laptop or personal computer and visit this site. After visiting you will get a rectangular barcode called as QR code on a screen of the laptop or personal computer.

Visit Web WhasApp
Visit web WhasApp 

Steps 3 : Now scan this QR code with mobile with screen received on mobile after a first step.

Scanning QR Code with a mobile

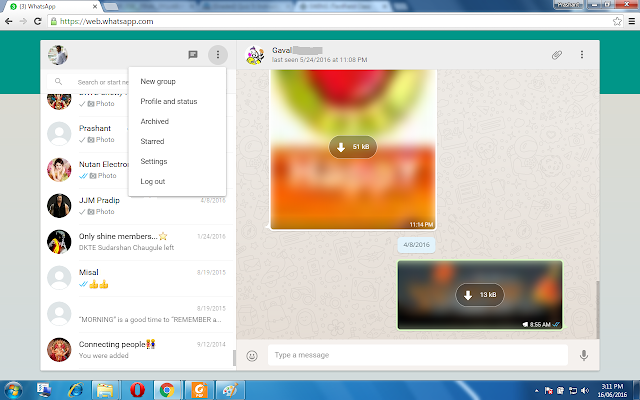
Step 4 : After scanning QR code with the mobile screen, the laptop will show your WhatsApp account on the laptop with contact on the left panel.

Getting WhasApp account on the laptop

Step 5 : Now select the contact or group for sending and receiving messages. While communicating on WhasApp you will get the same message on mobile as well as on laptop as they are synchronized.
Selecting group or account for communication


How to create chat shortcut to speed up communication on whatsapp

Now days it is hard to identify any mobile without whatsapp. Resent survey showed that whatsapp is most popular chatting application in world. While using whatsapp we may be communicating with large number of persons and may be member of various groups. Now if we are frequently communicating with any person or in any group we can create shortcut on mobile desktop for immediate communication with that person or group. Here are steps to create shortcut to speed up communication on whatsapp 

Step 1 Tap and hold the name of person or group for which you want to create shortcut.

contact selection for whatsapp chatting shortcut


Step 2 Click on three doted points in top right corner and select 'Add chat shortcut'

Selecting Add Chat Shortcut


Step 3 You will get person or group icon on home page. Touch on icon to communicate to person or group

short cut for whatsapp chatting
Created Shortcut on Home Page


How to create two authenticated whatsapp, twitter, hike accounts on single mobile through app

Yes, we can create multiple whatsapp, twitter, hike accounts on single mobile. There are various application allow us to create multiple accounts. One of them is Parallel Space. Using Parallel Space we can manage two accounts simultaneously on mobile. Steps to use parallel space for multiple accounts.

Step 1 : Install Parallel Space on mobile from here.
Step 2 : After installing parallel space application on your mobile, open it and click on '+' sign

Parallel Space for creating multiple authenticated accounts
Parallel Space App Screen for creating multiple authenticated Accounts

Step 3 : Now from listed applications select an application for which you want two accounts on mobile. 
Application Selection for Multiple Accounts in Parallel Space

Step 4 : Now follow the procedure to create an account for that application
Step 5 : After following procedure to create an account, you can run application from parallel space application by clicking on respective app on parallel space screen.
Step 6 : Now enjoy both authenticated accounts on your single mobile.
Multiple Account on Single Mobile through Parallel Space


How to convert .csv, .tsv textfile data in to excel

Most of the time, dataset available on internet is in text file. This text file might have extension as .csv stands for Comma Separated Values or .tsv stands for Tab Separated Values. To process this data in efficient manner we may want to store this data in excel. So here are steps to convert your text file to excel.

Step 1 : Open empty excel book and visit 'data tab' of book and click on 'From Text' option from it.

Opening excel to import .csv, .tsv data
Opening empty excel book and selecting data, From Text

Step 2 : Select the file from appropriate location and click on 'Import button'.

importing .csv, tsv files to excel
Importing File
Step 3 : Now select Delimited option to indicate values in text file are delimited by character such as white spaces or commas and click on Next button

values separated by comma, tab
Indicating values are delimited by characters
Step 4 : Now select exact separator for like tab, semicolon, comma, space. In our case we have to select comma.
values separated by comman
Indicating exact separator of values

Step 5 : You can select datatype for each column. By default it is general. You can change it as per your requirement. Then select Finish button.
Finishing importing csv tsv file data
Specifying data type for each column

Step 6 : You will get comma separated values in excel book.

imported data from .csv to excel
Data in excel